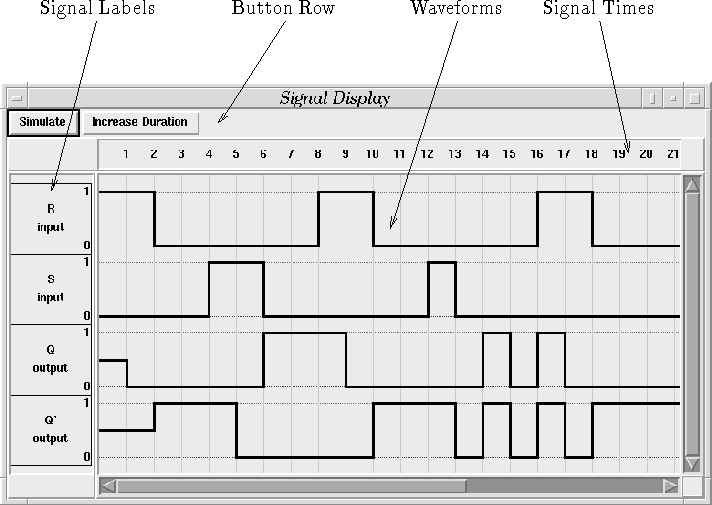
Figure 2.4: Signal Display Window
The second top-level window displayed by the GUI upon startup is the signal display window, presented in Figure 2.4. The purpose of the signal display window is to let the user edit the signals for each of the labelled input netlists and view the corresponding output signals generated from the circuit simulation. The signal display window is broken down into four major sections consisting of the signal waveforms, button bar, signal times and signal labels.

Figure 2.4: Signal Display Window
The largest portion of the signal display window is devoted to the signal waveform area. This section of the window displays the input/output waveforms which represent the signals that have travelled along each of the labelled netlists. In addition to displaying the input and output signals, this section of the window also lets the user modify the input signals to be processed by the circuit. To modify a signal, the user moves the mouse pointer to the waveform to be modified and then uses the leftmost mouse button to pull signals in the waveform high or low. The user may also ``draw'' the input waveform by clicking and holding the leftmost mouse button and dragging the mouse across the waveform. The signal values for the waveform will snap to the discrete signal value closest to the mouse pointer as the mouse is dragged. Currently, the waveform editor supports three discrete values: high, low and unknown; the latter of which is represented by a horizontal line in the middle of the high and low boundaries. The GUI explicitly prevents the user from directly modifying waveforms which are not input signals.
The button bar at the top of the window currently contains only two buttons, but it is relatively easy to add extra buttons should the need arise for extra functionality. These buttons provide access to features which directly affect the signal display window and are therefore located here instead of in the circuit editor window. When the user presses the Simulate button, the application first ensures that the circuit is complete (that is, the ports of all the components have been connected to a netlist). After this check, descriptions of the circuit and its input signals are composed and sent to the simulator engine for simulation. After simulation, the results are fed back to the GUI which then parses the results and displays the subsequent output waveforms in the signal display window. The Increase Duration button simply adds ten time units to the time line so that signals in the waveform area can be extended further in time. Unfortunately, the total duration of the signals cannot yet be decreased.
The signal times portion lies immediately beneath the button bar and runs horizontally, thereby annotating the waveforms beneath it. This portion of the signal display window is non-interactive and serves only to denote the time of the signal values beneath it.
The signal labels section runs vertically down the left hand side of the window and is divided into subsections, each of which represents a labelled netlist in the circuit editor window. Each subsection contains the name and type of the netlist it represents and annotates the signal waveform immediately to its right. Signals may be rearranged by clicking and holding the leftmost mouse button on the signal label to be moved and then vertically dragging the signal label to the desired location. After the mouse button is released, both the signal label and it corresponding waveform will be moved to the new location and all other signal labels and waveforms will be adjusted accordingly.
In the current implementation, netlists have three types, input, output and unknown; the type of each netlist is displayed below its name in the signal labels section. By default, all unconnected netlists created by the user are given the type unknown. As netlists are soldered to the ports of components, the type of the netlist changes automatically in the signal labels section to reflect their new type status. For example, if the user connects an isolated netlist to the input port of a component, then the word unknown will be replaced by the word input below the label name. The complete rules for netlist type determination are outlined in Section 3.6.2.
Like the workarea of the circuit editor, the signal display also employs two scrollbars. However, in addition to scrolling the waveforms, these scrollbars also scroll the signal labels or signal times as the user scrolls the vertical or horizontal scrollbar respectively. Hence the signal labels and times always line up correctly with the waveforms.