The two modules related to the high-level operation of the workarea are presented in Table 3.3. A number of lower-level submodules related to components, netlists and multiboxes are also related to the workarea and are presented in subsequent sections.
| Module Name | Purpose |
| attrib.tcl | Highlights and dehighlights workarea circuit elements (such as components and wires) as the mouse pointer enters and leaves them. |
| workarea.tcl | This module is responsible for the creation, configuration and manipulation of the workarea upon which the components and netlists are placed, modified and deleted by the user. |
The workarea is created by the procedure workarea_create of the workarea.tcl module. Its basic duties are to create and position the workarea canvas and the horizontal and vertical scrollbars. It also dispatches another procedure to draw the grid lines on the canvas using the intensity specified in the user's configuration file. The workarea.tcl module also contains procedures which translate between screen and canvas coordinates and some data abstraction procedures which return the workarea widget and canvas widget for use by other modules.
The second module related to the workarea, attrib.tcl, changes the colour and width attributes of circuit elements as the mouse pointer enters and leaves them. This is done so that the user can easily determine which circuit element will be affected by the current operation. All the procedures contained in this module work basically the same way. The parameters to these procedures consist of the workarea canvas widget name, the highlighted status of the element (either normal or selected) and the tag or identifier of the circuit element to change. The procedures retrieve the desired colour and width attributes of the circuit element from the resource database and then use the itemconfigure canvas widget command to change the appearance of all the canvas primitives which comprise the circuit element. For some circuit elements, such as wires and points, this operation is simple, since they are comprised of only one canvas primitive. For more complicated elements such as gates, the operation must iterate over all the canvas primitives which comprise the element and change the width and colour attribute for each primitive.
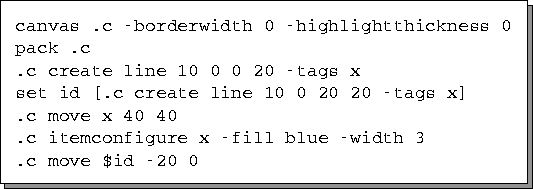
A brief discussion of how structured graphics are created and
manipulated using the Tk canvas is in order. Consider the
short, but complete, code fragment presented in Figure 3.5.
The first two lines simply create a canvas and place it on the
display. Note that -borderwidth and
-highlightthickness are called widget options
and control the width of the canvas border and the thickness of the
highlight focus ring surrounding the canvas respectively.
In this particular case, they are
both set to zero, meaning that the canvas will have no border and no
highlight focus ring. The next two lines use the
create canvas widget command to create two canvas items.
These two commands create two short oblique line segments which
intersect each other at their end points, forming a ![]() in the
upper left region of the canvas.
in the
upper left region of the canvas.

Figure 3.5: Creating Structured Graphics on a Canvas
The create canvas widget command always returns a unique numeric identifier representing the canvas item just created, so that the canvas item may be referenced in the future. In our code example, the identifier of the first line is returned but discarded by our script. The identifier of the second line, however, is saved in the variable id, as it is used later. Also note that each of the line segments created are given the tag x, which may be used in the future to refer to both of these canvas items as a single entity.
The fifth line of the script moves all canvas items tagged with
x 40 pixels down and 40 pixels to the right relative to their
last position. Both lines are moved because they have both been tagged
with the x tag when they were created. The sixth line then
modifies the -fill and -width attributes of both
lines to blue and 3 respectively using the
itemconfigure widget command. This has the effect of
colouring both line segments blue and increasing their width, making
them easier to see on the canvas. Finally, the seventh line moves the
canvas item identified by the contents of variable id (the
second line segment created earlier) 20 pixels to the left. The end
result of this script is that a ![]() will be displayed at an offset
of 30 pixels horizontally and 40 pixels vertically from the upper left
corner of the canvas widget.
will be displayed at an offset
of 30 pixels horizontally and 40 pixels vertically from the upper left
corner of the canvas widget.
Note that when this script is run, the user will see only the cumulative
results of all the canvas operations; the creation of the ![]() and its subsequent manipulation will not be seen. This is because
Tk, for efficiency purposes, buffers all the screen updates
until idle time is available to actually flush the updates to the
display. To actually see the effect each line of the script has on the
canvas, the code sequence ``update; after 1000'' can be inserted
between each line. This causes Tk to flush the updates to
the display immediately and to wait 1000 milliseconds (one second) so
that the user may see the incremental effects of the script.
and its subsequent manipulation will not be seen. This is because
Tk, for efficiency purposes, buffers all the screen updates
until idle time is available to actually flush the updates to the
display. To actually see the effect each line of the script has on the
canvas, the code sequence ``update; after 1000'' can be inserted
between each line. This causes Tk to flush the updates to
the display immediately and to wait 1000 milliseconds (one second) so
that the user may see the incremental effects of the script.